Key takeaway:
- Cleanliness is crucial when dealing with a used couch, ensuring removal of dirt, allergens, and bacteria. Always check the label for specific cleaning instructions before you start.
- Understand the couch’s material to determine the appropriate cleaning products and methods.
- A thorough vacuuming is the first step to remove loose dirt and debris. The chosen cleaning method for the cushions depends on their material and cleanliness level.
- Disinfect the couch to eliminate germs and bacteria. Use a suitable disinfectant spray or a water-vinegar mixture.
- Bug spray helps eliminate potential pests, such as bed bugs, hiding in the upholstery.
- Odor removal can be achieved using various methods, including baking soda, fabric fresheners, or natural odor-neutralizing sprays.
- Stain removal depends on the stain type and fabric. It could involve stain removal products, steam cleaning, or professional services.
- Deep cleaning with a handheld steam cleaner helps remove embedded dirt and odors, revitalizing the couch.
- Maintain cleanliness by regular vacuuming, prompt stain removal, and avoiding food or drinks on the couch.
Introduction: The importance of properly cleaning a used couch before use.
Cleaning a used couch before use is crucial to ensure hygiene and maintain its quality. Neglecting cleanliness could lead to the spread of germs and allergens, which can pose health risks. It is essential to thoroughly clean and sanitize the couch to create a healthy and comfortable living environment. Additionally, cleaning a used couch removes any unpleasant odors and stains, making it more visually appealing. Taking the time to clean and prepare a used couch will contribute to a safer and more enjoyable experience for users.
Understanding the cleaning process:
Cleaning a used couch can be a daunting task, but with a keen understanding of the process, it needn’t be. Here’s a three-step guide to help you transform your couch into an inviting place to unwind:
- Know Your Fabric: The first step on the road to a refreshed couch is deciphering the fabric type. Keep an eye out for any labels or tags that might offer crucial cleaning guidance. Understanding the material that cradles you each time you sit will help you choose cleaning products that are effective and kind to the fabric.
- Address Those Stains: Prior to diving into a full-blown cleaning session, it’s wise to tackle those standout stains. Each blotch or smudge requires tailored care—choosing the right stain remover or technique based on the fabric and type of stain is essential. By giving these trouble spots extra attention, you ensure they won’t steal the spotlight when your couch is otherwise clean and sparkling.
- Time to Clean and Dry: With pre-treating complete, it’s time to embrace the overall cleaning process. The cleaning agent or method you select—be it an upholstery cleaner, a steam cleaning session, or a gentle dance between soap and water—should be a good fit for your fabric type and any instructions you’ve found. After all the scrubbing and wiping, it’s crucial to thoroughly dry your couch to stave off any mold or mildew eager to set up camp.
Cleaning a used couch isn’t just about the one-off effort; it’s about ongoing care. Make sure to avoid drowning the couch in water or dousing it in harsh chemicals, which could do more harm than good.
Regular maintenance and a quick response to any new stains will help keep your couch looking and feeling its best. By unlocking the secrets of the cleaning process and following these steps, you’re on your way to a clean, comfortable, and durable couch. So, sit back, relax, and enjoy the fresh feel!
Step 1: Look for a label
Cleaning a used couch begins with a touch of detective work. Your first mission? Locate the label, the secret informant with all the essential cleaning instructions.
Here’s a three-step guide that will turn you into a pro couch investigator in no time:
- Couch Inspection: Every couch has secrets, and it’s time to unearth them. The label you’re looking for is usually discreet, taking refuge under the cushions or hiding on the backside of the couch. It communicates in coded phrases like “clean with water-based detergent” or “professional cleaning recommended.” These secret codes hold the key to a successful couch cleaning operation.
- Decoding Instructions: Found the label? Excellent! Now, it’s time to read the fine print. Some couches enjoy a dry-clean-only lifestyle, while others are amenable to spot cleaning. Respect the preferences mentioned on the label to maintain a harmonious relationship with your couch and avoid unintentional damage.
- When the Label is MIA: In the absence of a label, or when it’s morphed into an unreadable relic, exercise caution. Perform a patch test on an unnoticeable corner of the couch with a gentle cleaning solution. This undercover operation will help determine if the cleaning agent is safe for your couch without alerting the whole surface.
Remember, couches come in various disguises, each demanding a unique care routine. Leather couches, for instance, require specialized cleaners, while fabric couches might prefer a mild detergent. When in doubt, always stick to the manufacturer’s instructions or consult with a professional cleaner.
Following these steps ensures your couch cleaning mission is a success. So, put on your detective hat, respect your couch’s individuality, and get ready to unveil a cleaner, fresher living room staple.
Step 2: Know your materials

A deep understanding of your couch’s materials is pivotal in embarking on the cleaning journey. Each material has its unique cleaning needs and demands. This guide will take you through the steps to identify and care for the fabric that makes up your couch:
- Couch Exploration: Start by inspecting the upholstery. Is it cloth, leather, or a mix? Identifying the material is your compass, directing you towards the right cleaning supplies and methods.
- Reading the Couch’s Memoirs: Look for tags or labels whispering the cleaning instructions. These memoirs of the couch often contain treasure troves of information, including recommended cleaning techniques and precautions.
- Spot Test Trial: Before you paint the entire couch with a cleaning solution, conduct a trial run on a hidden spot. This sneak-peek can reveal if the cleaner is a friend or a foe, saving you from potential discoloration or damage.
- Consulting the Manufacturer’s Manual: If you have the brand details handy, refer to the manufacturer’s website or reach out to their customer service. Their tailored cleaning recommendations are like personalized advice from a trusted friend.
- Calling in the Cavalry: Some couches, particularly those with delicate or antique fabrics, might demand the expertise of a professional cleaner. Evaluate the couch’s condition and don’t hesitate to seek expert guidance if needed.
- Assemble Your Cleaning Arsenal: After gathering intel on the fabric, prepare your cleaning kit. A mild detergent, an upholstery cleaner, soft brushes, microfiber cloths, and other specific products recommended for your couch material should be in your arsenal.
Understanding your couch’s materials is an essential aspect of the cleaning process, protecting your upholstery from accidental harm. By following these steps, you’re setting the stage for a successful cleaning operation that preserves the couch’s charm.
Fun Fact: Some fabrics like suede or velvet are like high-maintenance friends, requiring special attention and specific cleaning techniques to prevent irreversible damage. (source: How to Clean Upholstery, The Spruce).
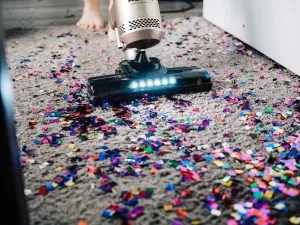
Step 3: Start with a good vacuum
Kickstarting your cleaning expedition with a rigorous vacuuming session lays a robust foundation for an immaculate couch.
The transformation of a used couch into a fresher, cleaner seating haven begins with these five steps:
- Stage Clearance: Initiate by evacuating the surface. Toss aside loose cushions to gain unhindered access to all corners and crevices of the couch.
- Harnessing the Tools: Adorn your vacuum cleaner with the appropriate battle gear – the crevice tool and upholstery brush. These tools augment the cleaning reach, promising a more thorough cleanse.
- Surface Expedition: Commence by vacuuming the entire surface of the couch. Pay special heed to the seams and hidden corners, the favored hideouts of dirt and debris.
- Unveiling the Hidden: Lift and peek beneath the cushions, exploring the cracks in between them for concealed dirt and debris. Vacuum these hideaways relentlessly.
- Border Patrol: Last, but not the least, turn your attention to the edges and sides of the couch. Give them a vacuuming makeover to dislodge any stubborn dust or lint clinging onto them.
Embrace these steps to chart a successful vacuuming voyage, dislodging the loose dirt, dust, and debris from your couch. This endeavor not only breathes freshness into your used couch but also transforms it into a healthier and inviting lounging spot.
Remember, your pursuit of a rejuvenated couch mandates a deep and thorough cleaning. Don’t shortchange this crucial vacuuming step as it paves the way towards a cleaner, more hygienic couch that will surely be the centerpiece of your living space.
Step 4: Decide on how to clean couch cushions

Tackling the cushions of a used couch warrants a mindful approach. This pivotal step begins with an astute evaluation of the cushion fabric and the feasibility of detaching the covers. If they are removable, embark on a quick search for care instructions tagged onto them. Adhering to these guidelines will ensure a safe cleaning journey.
In scenarios where the cushion covers are non-removable, don’t despair. Gently spot-clean those stubborn stains with a mild cleaning solution. However, exercise caution by trialing this solution on a discreet area first, ensuring it’s friendly to your fabric. Post cleaning, grant the cushions ample time to air-dry under natural conditions before reinstating them on the couch.
Remember, the key to successful cushion cleaning lies in respecting the fabric’s uniqueness. Tailoring your cleaning techniques to match the cushion material safeguards it from potential damage, ensuring longevity and retaining its aesthetic appeal. With these mindful practices, you’re well on your way to transforming your used couch into a cozy, clean, and inviting seating arrangement.
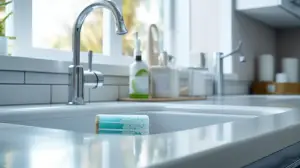
Step 5: Disinfect the couch
For a couch that’s as clean as it is comfy, you can’t overlook the critical process of disinfection. With a few easy steps, you’ll not only banish hidden grime but also combat invisible germs that may be lingering on the surface. Here’s how:
Step 1: Blend the Disinfectant – Craft your germ-busting mix with equal parts of water and disinfectant cleaner in a trusty spray bottle. Give it a vigorous shake to make sure it’s blended to perfection.
Step 2: Trial Run – Every couch is unique, so before you unleash the disinfectant onto your couch, give it a trial run. Choose a hidden area and give it a light spray to ensure the solution won’t have an adverse reaction with the fabric.
Step 3: Disinfection in Action – Now that you’re sure your mix is fabric-friendly, it’s time to get down to business. Spritz your disinfectant across the couch, making sure to give special attention to areas that see the most use, like armrests and cushions. Let the solution sit for the duration mentioned on the disinfectant cleaner’s label to work its magic.
But remember, as with all cleaning processes, it’s essential to respect the integrity of the material. Always refer to the manufacturer’s instructions for your specific type of couch to avoid accidental damage to the fabric or upholstery.
By embracing regular disinfection, especially during flu season or when a family member is under the weather, you’re investing in the health of your household. So don’t delay – seize the opportunity to create a cleaner, healthier environment. Start your disinfection journey today, and revel in the peace of mind that comes with a couch that’s genuinely clean.
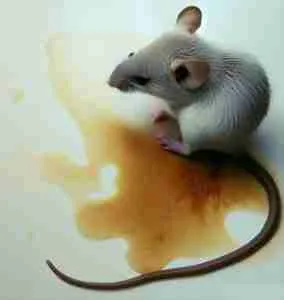
Step 6: Bug spray
The cleaning journey of a used couch isn’t complete without addressing the potential tiny invaders – bugs. They might be lurking unseen, but their effect can be substantial.
Here’s a five-step plan to wield bug spray effectively and secure your couch from these minute intruders:
- Bug Hunt: Start with a thorough examination of the couch. Scan it for signs of bug activity – tiny dark spots, minuscule droppings, or their little eggs. Pay extra attention to seams, nooks, and crannies – bugs’ favorite hiding spots.
- Bug Spray Selection: Choose your weapon wisely. Opt for a bug spray that’s expressly designed for indoor upholstery use. It should be fabric-friendly and suitable for the material of your couch – be it synthetic or natural fibers.
- Ready, Set, Prep: Before you begin the bug-banishing process, ensure all loose items and cushions are removed from the couch. Open up windows or turn on fans for proper ventilation, minimizing chemical exposure.
- Bug Spray in Action: Now, it’s time to battle. Follow the product label instructions and apply the bug spray evenly across the affected areas. Remember – bugs love to hide, so cover all seams, corners, and crevices thoroughly. But, moderation is key – avoid soaking the fabric to prevent any potential damage.
- Drying and Ventilation: Post-spray, let the couch dry out completely. Keeping the room well-ventilated during this time will help dispel any residual chemical odors and aid in effective drying.
Remember, using bug spray is not a stand-alone solution but a component of a comprehensive cleaning approach. Regular upkeep of your couch and maintaining cleanliness in its surroundings are fundamental to prevent bug infestations. By employing this strategy, you’ll not only rid your couch of bugs but also ensure a healthier, bug-free living space. So, let bug spray be your trusted ally in this cleaning endeavor!
Step 7: Odor removal and neutralization
Turning a used couch into a refreshingly clean piece of furniture is more than just a surface-level affair. It requires rooting out hidden odors that have seeped into the upholstery over time. Follow these four stages to tackle odors, replacing them with a clean, welcoming scent:
- Investigation: Your first task is to play detective and identify the culprit behind the unpleasant smell. It could be anything – pet accidents, stale cigarette smoke, or remnants of food and drink mishaps. Pinpointing the source allows you to choose the most effective odor-combating method.
- Targeted Cleaning: Having identified the source, focus on any stains or spills that might be contributing to the odor. A gentle cleanser or a home-made solution of vinegar and water can work wonders. Apply it to the affected areas, allow it to work its magic for a few minutes, then blot it dry with a clean cloth.
- Operation Deodorize: Now, it’s time to wage war on the overall odor. Enlist the help of baking soda – a natural odor absorber. Sprinkle it generously all over the couch, paying extra attention to the especially odorous spots. Let it sit for at least 15 minutes, allowing it ample time to absorb and neutralize the odors. Afterwards, vacuum the couch thoroughly to remove the baking soda residue.
- Fresh Air Finish: Finally, let the couch breathe. Position it in a well-ventilated area or open up windows to let fresh air circulate around it. A fan or air purifier can also be a great ally in this stage, assisting in eliminating any lingering smells and replacing them with a fresh, clean scent.
Taking the time to properly eliminate and neutralize odors ensures not only a delightful living space, but also contributes to the longevity of your couch. A couch that both looks and smells great is surely an accomplishment worth striving for!
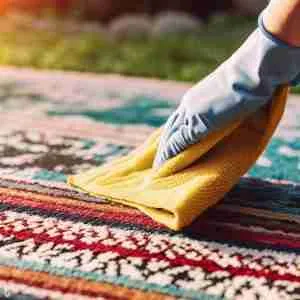
Step 8: Stain removal process

Treating a stain on a used couch is akin to solving a mystery. The better you understand the culprit behind the stain, the more equipped you are to deal with it. Here’s a step-by-step guide to mastering the art of stain removal:
- Identify the stain: Start by examining the couch, putting on your detective hat to deduce what type of stain you’re dealing with. It could be a food splash, a beverage spill, or an unfortunate souvenir from a pet. Understanding the nature of the stain helps you choose the right cleaning method.
- Pre-treat the stain: Before deploying a cleaning agent, absorb as much of the spill as you can with a clean cloth or paper towel. Gentle blotting can prevent the stain from embedding deeper into the fabric or spreading further.
- Use a suitable cleaner: With the stain type identified, select a cleaning solution specifically designed to tackle that particular enemy. Do remember to conduct a patch test on a hidden part of the couch to ensure your cleaning solution won’t betray you by damaging or discoloring the fabric.
- Blot the stain: Armed with your tested cleaner and a fresh cloth or sponge, approach the stain gently but decisively. Blot the affected area, gradually moving from the edges towards the center. Vigorous rubbing can push the stain deeper or damage the fabric, turning an ally into an adversary.
- Refresh and Dry: Once the stain has been banished, rinse the battlefield with a cloth dampened with water to remove any remnants of the cleaning solution. Allow the couch to air dry, or call upon a fan to expedite the drying process. Resist the temptation to use the couch until it’s completely dry.
In the realm of stain removal, swift action, appropriate cleaning weapons, and a gentle hand are your best allies. Different types of stains may require different battle strategies, so always lean on the wisdom of product instructions and manufacturer’s guidelines. A clean, stain-free couch is the victory you’re aiming for!
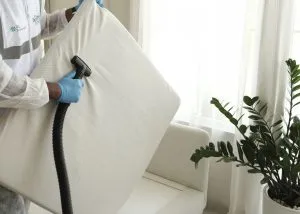
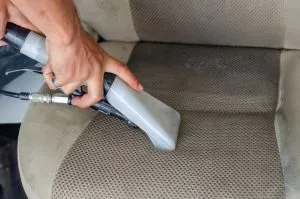
Step 9: Deep cleaning with a handheld steam cleaner
Harnessing the natural power of steam is an extremely effective way to give a used couch the deep clean it needs. It’s as if you’re giving your couch a spa treatment, rejuvenating the fibers and lifting out the deep-seated grime. Here’s how to master this transformative process:
- Preparing Your Steam Cleaner: Start by prepping your handheld steam cleaner, filling it with water as per the manufacturer’s instructions. This is the equivalent of loading your magic wand with powerful cleaning spells.
- Conquer the Couch: Now, it’s time to command your steam cleaner across the battlefield. Glide over every part of the couch—the cushions, armrests, backrest—leaving no corner unattended. Watch as the steam lifts away the dirt and grim, revitalizing your couch’s surfaces with each pass.
- Extra Vigilance on Stains: Keep your eyes open for any stubborn stains or spills that have marred the couch. These spots require your extra attention, so focus your steam cleaner’s efforts here until the stains begin to lift.
- Patience in Drying: Once your couch has received a comprehensive steam clean, it needs to rest and dry. Patience is key here, as the couch must be fully dry before you use it again to avoid any potential mildew or dampness.
Conclusion: Tips for maintaining a clean and fresh used couch.
Breathing new life into a used couch goes beyond a one-time cleaning spree—it’s a labor of love that demands regular upkeep to keep your couch looking its best. Here are five straightforward steps to keep your used couch not just surviving, but thriving in its new home:
- Regular Vacuuming: Show your couch some love with frequent vacuuming. Use a vacuum cleaner equipped with an upholstery attachment, sweeping away dust, pet hair, and debris with ease. Regular vacuuming will keep your couch looking pristine and feeling fresh.
- Timely Stain Removal: Accidents happen, but stains don’t have to be permanent. Swiftly attend to spills by gently blotting them with a clean cloth and a mild, water-based detergent. Remember, the key is to blot, not rub, to preserve the fabric integrity.
- Scheduled Deep Cleans: Deep cleaning your couch breathes new life into the fabric. Whether it’s steam cleaning, dry cleaning, or employing a commercial upholstery cleaner, it’s crucial to consider the couch material and follow the manufacturer’s recommendations.
- Fabric Protection: An ounce of prevention is worth a pound of cure. Using fabric protectors can fortify your couch against spills and stains, creating a barrier that repels liquids and helps prevent unwanted seepage into the fabric.
- Regular Maintenance: A well-kept couch requires more than just cleaning. Regularly fluff and rotate cushions to evenly distribute wear and tear, maintaining a uniform look. A little ‘couch primping’—smoothing out fabric wrinkles and plumping up pillows—goes a long way in keeping your couch inviting.
In the world of couch maintenance, neglect is the enemy. Overlooking the importance of regular cleaning and care can lead to a buildup of dust, allergens, and even unpleasant odors, impacting not just your couch, but the overall ambiance of your living space. Don’t let your couch become a statistic—embrace these steps and revel in the satisfaction of owning a used couch that sparkles like new.
Five Facts About How to Clean a Used Couch:
- ✅ It is important to check the cleaning instructions or recommendations on the label of a used couch. (Source: Team Research)
- ✅ Vacuuming is an essential first step to remove dirt and debris from a used couch. (Source: Team Research)
- ✅ Some couches have removable cushion covers that can be washed in a washing machine with mild laundry detergent. (Source: Team Research)
- ✅ Disinfecting the couch with a fabric disinfectant spray is recommended before use. (Source: Team Research)
- ✅ Stains on a used couch can be removed using a mixture of white vinegar, water, and dish soap or a commercial stain remover. (Source: Team Research)
FAQs about How To Clean A Used Couch
How often should I clean my used couch?
The frequency of cleaning your used couch depends on how often you use it and how dirty it gets. As a general guideline, it is recommended to clean your couch at least once every 6-12 months to maintain its cleanliness and freshness.
Can I use mild dish soap to clean my used couch?
Yes, mild dish soap is a safe and effective option for cleaning your used couch. Mix a few drops of mild dish soap with water in a spray bottle, and use it to spot clean any stains or soiled areas on your couch.
Is it necessary to use bug treatment on my used couch?
Applying bug treatment to your used couch is not always necessary. However, if you have spotted bugs or want to ensure that any potential lurking pests are eliminated, using an eco-friendly bug treatment specifically designed for upholstery is a good precautionary step.
Can I wash the cushion covers of my used couch in a washing machine?
If your cushion covers are removable and machine-washable, it is generally safe to wash them in a washing machine with mild laundry detergent. However, always check the manufacturer’s recommendations for washing instructions to avoid any damage or shrinkage. Air drying the cushion covers is recommended.
How do I remove odors from my used couch?
To remove odors from your used couch, sprinkle baking soda liberally over the entire surface of the couch. Let it sit for at least one hour to absorb the odors, then vacuum the baking soda. If the odor persists, create a mixture of equal parts white vinegar and water with a few drops of mild dish detergent. Spray this mixture on the couch and let it sit before blotting it with a microfiber cloth.
What is the recommended way to deep clean a used couch?
Using a handheld steam cleaner is a recommended method for deep cleaning a used couch. The steam helps to eliminate dirt, stains, and odors from the upholstery. Simply follow the instructions provided by the steam cleaner manufacturer and ensure that you allow the couch to fully air dry after steam cleaning.
Additional Reading
If you’re looking to learn more about cleaning different parts of your home and belongings, these articles provide in-depth guides to a range of topics:
- How to Get Grass Stains Out of Jeans: Grass stains can be tough to remove, especially from jeans. Discover effective ways to get rid of them in this detailed guide.
- How to Clean Shower Tiles Without Scrubbing: Learn how to maintain your bathroom’s cleanliness with minimum effort. This guide offers techniques to clean shower tiles without heavy scrubbing.
- How to Unclog a Toilet When Nothing Works: Faced with a stubborn toilet clog? This article provides advice on what to do when traditional unclogging methods don’t work.
- Fix a Leaky Bathtub Faucet: A leaky faucet can be a nuisance and waste water. Find out how you can fix this issue with this step-by-step guide.
- Get Rid of Mold in Bathroom Ceiling: Mold in the bathroom can be harmful to your health. Learn the best ways to get rid of it and prevent its recurrence in this article.